How to use VCDS (Ross-Tech) on a Mac
Rumor has it that you can run VCDS on a Mac... here's how
This post is only for Macs with Apple Silicon (M1, M2, etc.) processors. If you’re unsure which processor you have, follow this support page. If you’d like info for how to use VCDS with an Intel-based Mac, let me know in the comments!
Intro
I see a few people online confirming that VCDS works on a Mac, but I don’t see many tutorials of how they did it. It’s relatively straightforward but I figured I’d make a tutorial to remove any possible confusion.
TL;DR
- Ensure your HEX-interface is seeing your computer: both LEDs should be blinking blue (interface connected to computer only) or green (interface connected to computer + vehicle)
- Create a Windows virtual machine (VM) on your Mac
- Install VCDS in your Windows VM
- If you plan on using your HEX-interface via USB, connect the USB device to your VM
- Open up VCDS, go through the program options to create a configuration for your device
- Test the connection, then get to work!
Some VCDS Background
VCDS is a “Windows-based diagnostic software for Volkswagen / Audi / Seat / Skoda”. VCDS is a software program which talks to a HEX-interface (hardware) which is plugged into and communicates with your vehicle. VCDS needs a hardware interface in order to communicate with a vehicle.
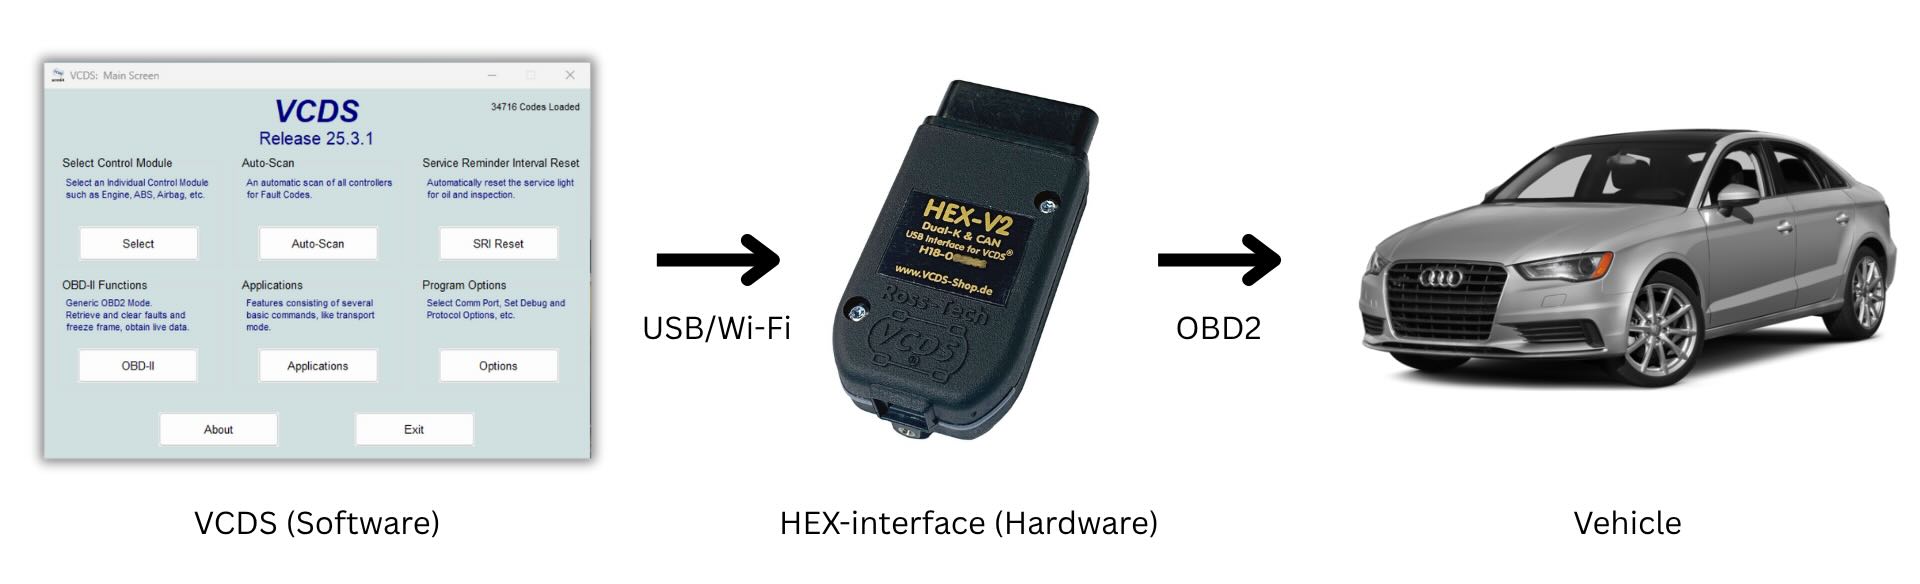 Architecture of VCDS
Currently Ross-Tech offers two hardware interfaces: HEX-V2 and HEX-NET. HEX-V2 will communicate with VCDS via USB. HEX-NET will communicate with VCDS via USB or Wi-Fi.
VCDS is the full-fledged software program used with a hardware interface. It is written for Windows and they have no plans of writing a version for Mac or Linux.
They also offer VCDS-Mobile to communicate to a hardware interface via Wi-Fi and a web browser. Because you only need a web browser and Wi-Fi, you can use VCDS-Mobile with any Android, iOS, Mac, Linux, Windows, etc. VCDS-Mobile is simply a local webpage hosted by a hardware interface and currently HEX-NET is the only hardware interface that supports this. Also worth noting is VCDS-Mobile is currently in beta and does not have full feature parity with VCDS.
Legacy HEX Hardware Interfaces
There are many legacy HEX hardware interfaces such as HEX+CAN, HEX+COM, etc. These interfaces requires installing “USB Drivers for Legacy Interfaces” which are only available in x86-64 VCDS. This requires installing a x86-64 version of Windows. This is possible on an Apple Silicon Mac with UTM (I can confirm), but requires emulation of an Intel CPU. Expect much, much more CPU usage and much, much slower operation.
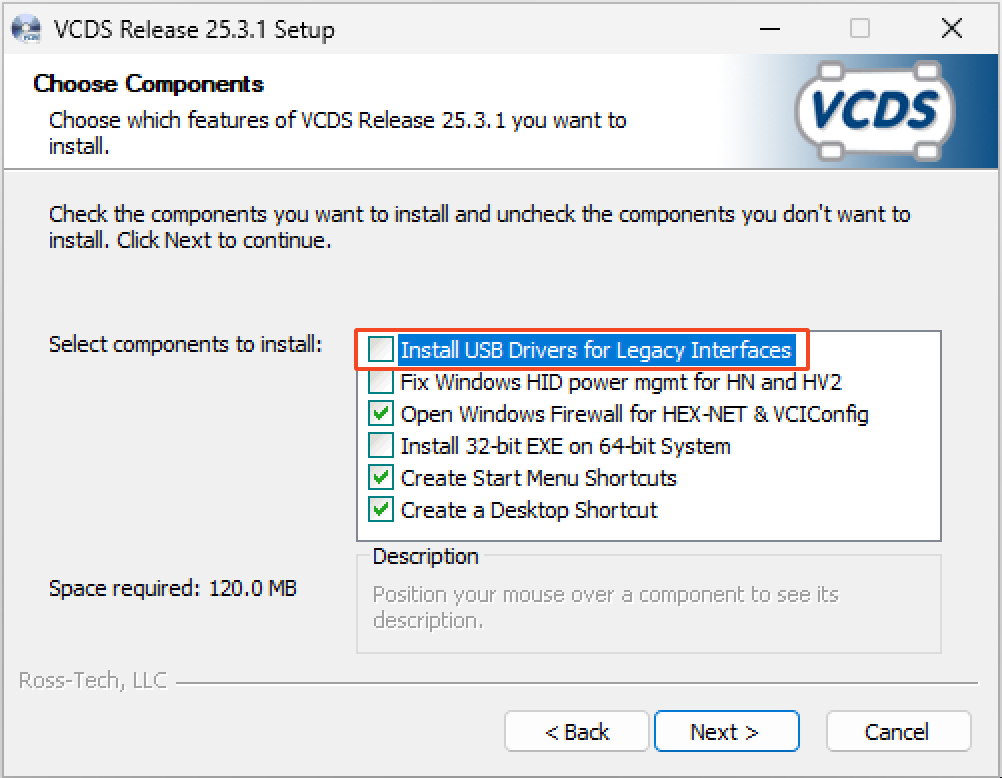 Checkbox needed during installation to support legacy HEX hardware interfaces
Basic Hardware Check
Confirming USB Connection
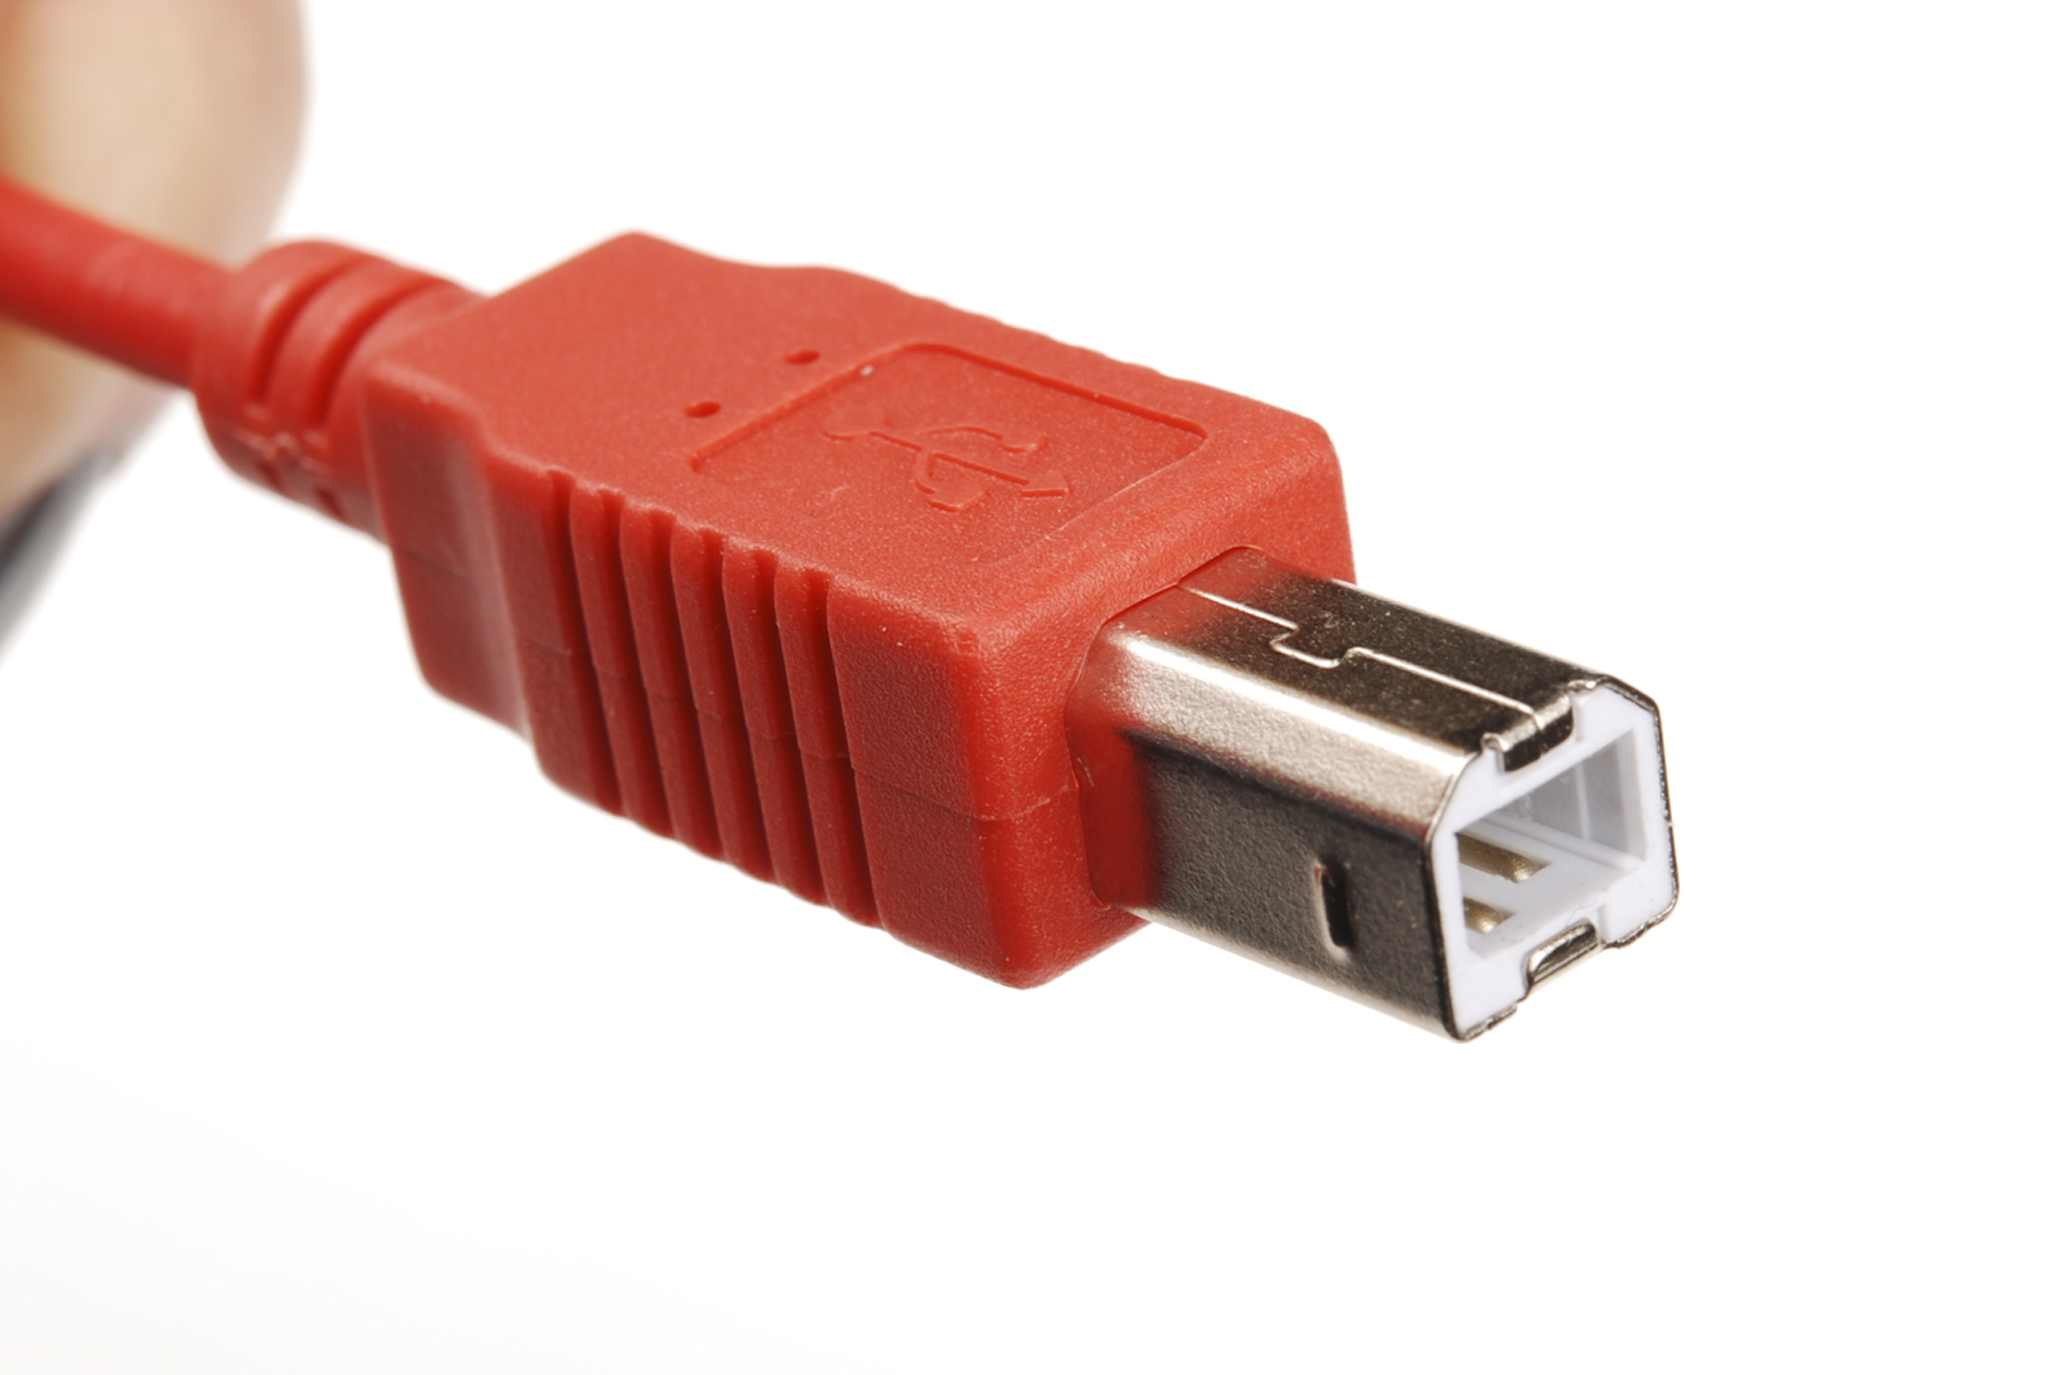
If our hardware interface doesn’t work, then there’s no need to go any further as VCDS won’t have anything to communicate with. I have a HEX-V2 so connecting to VCDS is accomplished only via a USB-B cable (sometimes referred to as a printer cable). The first thing we need to do is verify that our computer sees the HEX-V2 interface. This can be confirmed by seeing both lights on the hardware interface blinking blue. On a Mac, you can also go to the System Report (Settings –> General –> Scroll to the bottom –> System Report) –> USB and you should see a “Ross-Tech HEX-V2” device confirming the connection.
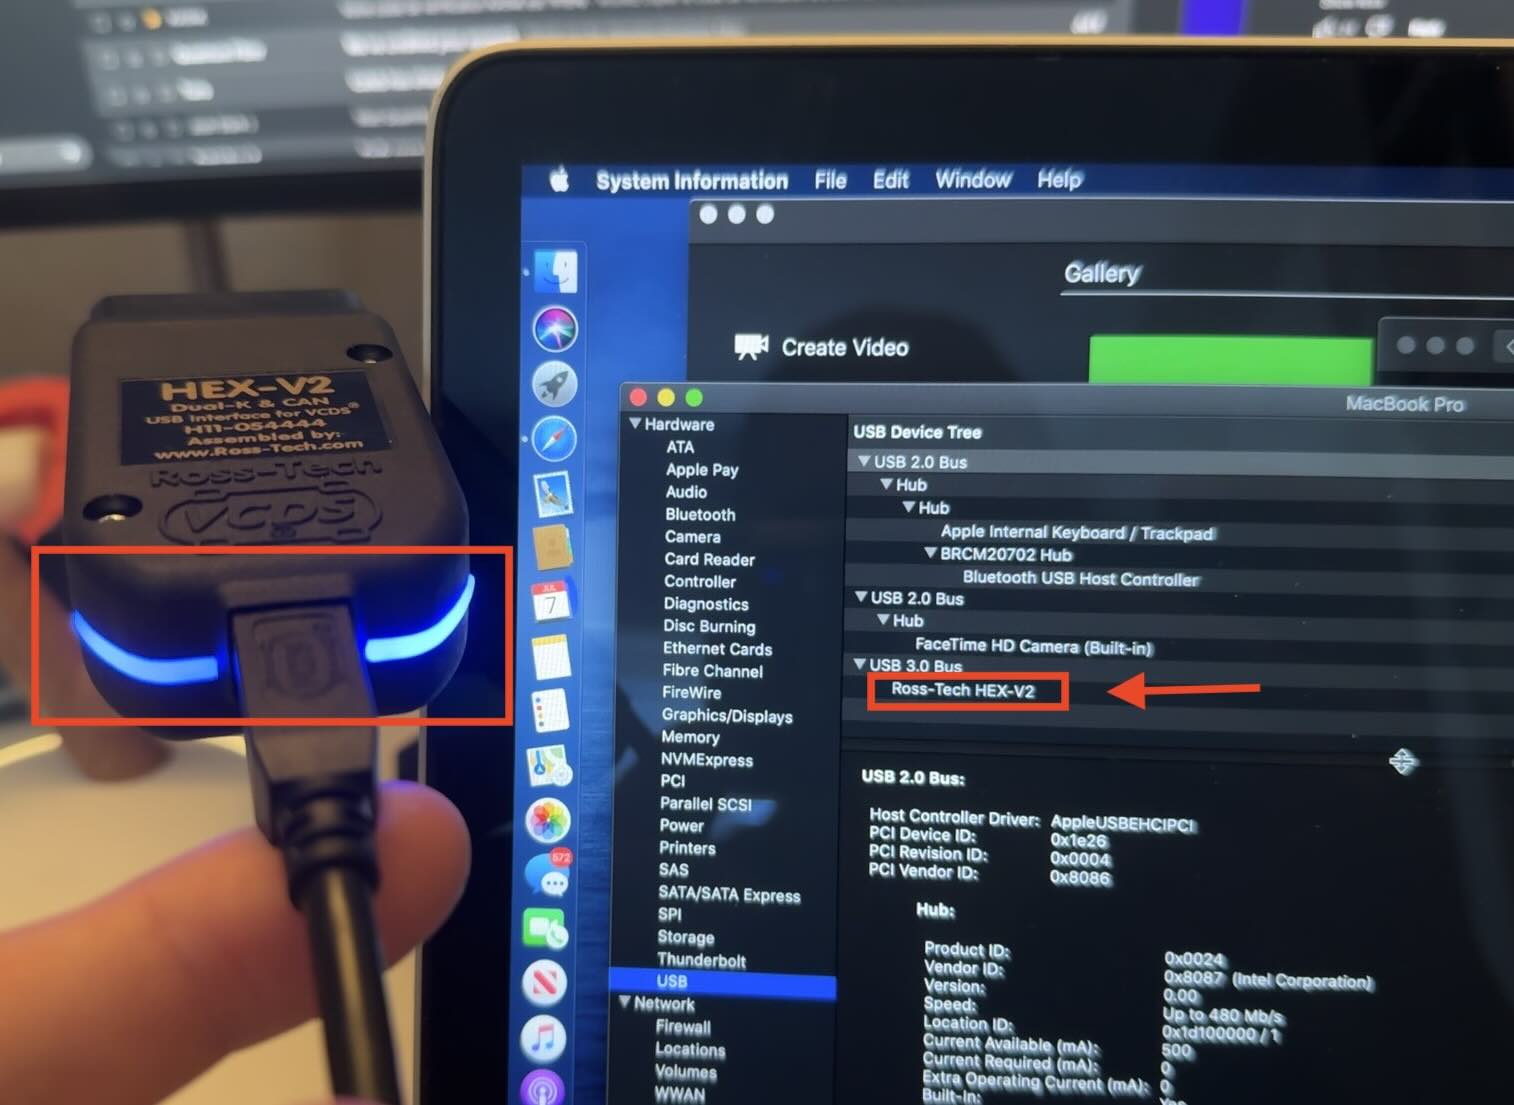 Successful HEX-V2 connection to a 2014 MacBook Pro
Troubleshooting Bad USB Connection
If you only see one blue blinking LED (or both LEDs blinking red), that means the interface has power, but no data. In my experience, this was due to a faulty cable. Try bending either end of the cable in all directions or pushing the cable together to “shorten the cable” next to the ends. The goal here is to try to touch some internally frayed wires back together. For me, this was bending the USB-A side of the cable greater than 45° + pushing the cable together a bit.
 A bad VCDS cable. Notice the lights on the HEX hardware interface going from blue to red.
I don’t believe this is a rare issue. I’ve seen a few posts in their forums that are resolved with a new USB-A to USB-B cable.
They also sell a USB-C to USB-B cable so that newer laptops won’t need to use a dongle. I purchased a slightly cheaper one (which I can confirm works).
Other blinking lights and their meanings are below (source): Initially when plugging the HEX hardware interface in, you should see one LED blink green for about 2 seconds. Then, you will see the following:
| LED blinking color | Power | Computer Connection | Vehicle Connection |
|---|---|---|---|
| Both off | |||
| Single Blue (older firmware) | ✅ | ||
| Both red (newer firmware) | ✅ | ||
| Both blue | ✅ | ✅ | |
| Both yellow | ✅ | ✅ | |
| Both green | ✅ | ✅ | ✅ |
Install VCDS
As I mentioned above, VCDS is “Windows-based diagnostic software”. Since we are using a Mac, we will need some way to install and run Windows. Because my hardware interface is a HEX-V2, I will need USB support, which is best accomplished with a virtual machine (VM). You may be able to use Wine or CrossOver with a HEX-NET, but I won’t be covering that in this post.
Create a Windows VM
There are a few different options for creating a virtual machine. This post will be using UTM as it is free and I have confirmed it works. For other VM options, see my post here.
To keep this post short, I’ve separated the Windows virtual machine section into its own post: How to Run Windows on Mac via UTM. Follow that guide, then come back here to install VCDS in your new Windows VM!
Install VCDS in Windows VM
- In our Windows VM, open Microsoft Edge
- Navigate to https://www.ross-tech.com/vcds/download/current.php
- Scroll down and click on the blue “DOWNLOAD” button
- Note that the scrolling preferences (natural vs reverse scrolling) maybe be different that what is set on your Mac. You may have to scroll up to go down, or vice versa.
- Open the
VCDS-Release-*-Installer.exefile once it is finished downloading - Click on
Nowhen prompted if you’d like to see the installation instructions - Click on
Next > - Accept the terms of the license agreement + click
Next > - Leave the default selected components. Click
Next >Open Windows Firewall for HEX-NET & VCIConfig+Create Start Menu Shortcuts+Create a Desktop Shortcutshould all be checked.- If you need
USB Drivers for Legacy Interfaces, you wil need to download and install Windows 11 x86-64. Apple Silicon Macs will need to “emulate” this VM (not “virtualize”). UTM can do this, but expect much, much less performance.
- Click
Install - Click
Finishto open VCDS
Use VCDS
- Plug in your VCDS hardware interface (HEX-V2, HEX-NET, etc.)
- Confirm the hardware device has a valid USB connection
- You should see both LEDs blinking blue or green on the hardware interface
- I’ve also found that my Mac has difficulties seeing the hardware interface if it is already plugged into a vehicle. If having difficulties, unplug it from a vehicle, then plug it into your Mac.
- Confirm the hardware device has a valid USB connection
- Open your Windows VM + open VCDS
- In your Windows UTM window, click on the “USB devices” (top right), then select your VCDS hardware interface to connect it to your Windows VM
- You may then get a popup saying “UTM wants to access
Ross-Tech HEX-*”, click to allow access. - You should hear a Windows chime alerting you that a device was connected
- You may then get a popup saying “UTM wants to access
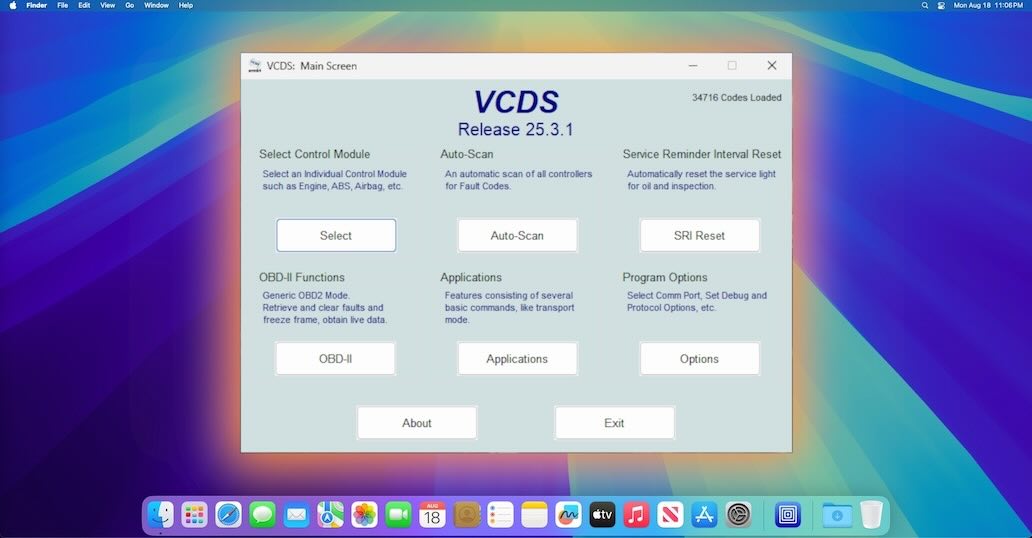
- In VCDS, you will see an information prompt stating “First use/No config file found”. Notice that all the VCDS buttons are greyed out. Click on
Optionsto tell VCDS how to connect to our hardware interface. - Select your correct “Port and Protocol Options”
- Since I am using a HEX-V2 via USB, I will select the “USB” port
- Click
Testto verify the connection - You will get a popup with some information about the connection. Click
OK- Hopefully it says `Interface: Found!”
- Click
Save
You can now use VCDS! Plug the hardware interface into your vehicle, then get to work.
A common first step would be to perform an “Auto-Scan”: Click on Auto-Scan, then click on Start to scan all the controllers in the vehicle for fault codes. This takes about 3 minutes for my 2015 Audi A3 (8V).