How to Replace and Fix a Tesla Model 3 Window Regulator Motor
A detailed guide of how I replaced the window regulator motor in my 2020 Tesla Model 3
TL;DR
- Remove window regulator motor
- Purchase new regulator motor
- Install new regulator motor
- Calibrate windows (optional but recommended)
Intro
The rear driver window in my 2020 Tesla Model 3 does not want to go down or up and sounds pretty close to a Family Feud error message.
Previously, this window would occasionally not roll up underneath the top trim because the B pillar’s rubber seal would not be flush when the door closed, forcing the window to be outside of the frame. I have a suspicion that this caused some added stress onto the window regulator motor.
I then manually pushed the window down by reaching around the B pillar and having one hand inside and one outside. You might need to do this to open the door so that the window isn’t stuck under the frame. After this, the window motor can move the window up and down a bit.
So that’s the current state of my rear driver window in my 2020 Tesla model 3. In this post, I’m going to show you how I fixed it.
Outline
In this post, I’m going to go through three main things:
- Disassembly so that you can look at your window regulator to inspect it to determine if you want to repair or replace
- You will likely end up choosing to replace because it’s really just sold as one large assembly. For example, you can’t buy just the regulator motor. So I’ll walk you through that process.
- Assembly, which will be glossed over as it’s just disassembly in reverse.
- Recalibrating the window motors so that they know when to stop lowering the window and when to stop raising the window.
Recalibrating the window motors might not be a bad place to start if your window motor sounds fine or if it seems to be moving the window fine but not all the way. This is just a few taps on the touchscreen and is very easy to do.
Tesla’s Free Service Manual
For starters, you should be aware that Tesla publishes a free service manual that is actually really good. This post will mainly just be following that with some additional commentary on things that were helpful to me as a DIYer.
Tesla Service’s Labor Pricing
The first thing I want to point out is that this is a fairly easy job. I have included enough detail, maybe too much so, that if you can operate a screwdriver, you can probably do this job. However, the juice might not be worth the squeeze. What I mean by that is Tesla has this replacement as a flat rate time (FRT) of 0.54 hours ≈ 32 minutes. At their 2025 hourly rate of $210/hr, that is $115 of labor. I think that is a very fair price as it took me about an hour to disassemble and an hour to reassemble. The window assembly is the same price whether you install it yourself or have them install it (~$165). However, the one downside of having them install it is you need to schedule an appointment and their availability may be sparse, I’d imagine a week out but it’s not unheard of for it to be multiple weeks. As I rent this car on Turo, I had a trip coming up and needed this fixed ASAP, so I had to take maters into my own hands.
Tools Needed
Screwdriver set that has everything you need ~$35 (affiliate link).
- Small flathead screwdriver
- T30 Torx bit
- 13mm socket
- 8mm socket
Removing Window Regulator
Okay, enough chit chat, let’s get our hands dirty.
- Remove puddle light
- The puddle light is located at the bottom of the door.
- Use a small screwdriver or pry tool in the slot at the front of the puddle light to pry the light out of the bottom of the door trim panel.
- Then, disconnect the electrical harness from the puddle light connector by pushing down on the little tab and then pulling the light away from the harness.
- Do be aware that the electrical harness wiring is pretty short, so you don’t have a ton of slack to work with.
- Remove door trim
- Next, we have two T30 screws to remove. The first one is hidden under the button to open the door. You’ll find this plastic cover that you can remove with a flathead screwdriver or pick tool, then remove the T30 screw.
- The other screw is located underneath the power window button. No plastic cover for this one, just unscrew the T30.
- Now we need to remove the trim panel. There are 10 plastic clips holding the trim to the door. Use the puddle light opening as an anchor point to break the trim free from the door. Break the trim free by swinging it out from the bottom. It will take some force.
- At this point, the trim is held in from a lip at the top. Lift the trim over the lip to pull it free. Be aware that it still has some wires keeping it connected to the door.
- Setting the trim panel down on a table (or in my case, a tire) was helpful.
- There are 3 electrical wiring harnesses to disconnect. One for the speaker that is just like the puddle light. You can release the plastic clip that attaches the electrical harness to the trim panel. Just wiggle it and pull it out
- To disconnect the last two connectors, simply pull on them with a decent amount of force.
- If you’re curious, the black connector powers the window regulator or motor. So if you connect this, you can still move the window up and down
- Lastly, they also mention to check the door for any remaining black push clip retainers. If you see any, pull them put and put them back into the trim panel.
- Remove door inner belt seal
- The “inner belt seal” is the black piece of rubber at the bottom of the window in the interior.
- There are 3 plastic clips on the outside of the seal and 3 plastic clips on the inside of the seal. Break these free, then lift the trim up to remove it.
- Remove glass / window
- To get access to the bolts holding the window, we need to remove the two rubber plugs that cover the opening in the door.
- The repair manual states that you need to temporarily reconnect the puddle light. I don’t think that is necessary but, just letting you know.
- Lower the window maybe 25% from the top, this will give you access to the window bolts.
- Once you have the window bolts aligned with the opening, you can remove them. They are 13mm.
- To remove the glass, lift it up and then “away from the run channel”. As you’ll notice, this means to lift the window towards the interior of the vehicle.
- Ideally, you would have somewhere soft to lay the glass down so that you don’t scratch it.
- Remove window motor / regulator assembly
- Disconnect the electrical harness from window motor / regulator assembly
- Release the 2 clips that attach the manual latch release cable to the window motor / regulator assembly
- Remove 13x 8mm screws around the outside of the black plastic panel to remove the assembly.
- Do not remove the four screws on the inside.
- They are a different size so hopefully they aren’t tempting.
- Do not remove the four screws on the inside.
- Once the screws are out, there are two metal clips holding the assembly to the door. The repair manual only mentions one so maybe newer models only have one but for me, there’s a clip on the bottom left and the bottom right.
- These clips take a good bit of force to disconnect.
- To lift the assembly out, pull it away from the bottom, then slide the assembly down.
Boom! The assembly is out and ready to be replaced or repaired.
I do not know what the issue was with mine and I did not investigate. Like I said earlier, you can’t buy any pieces of this, just the whole assembly, so that’s what I ended up doing. If you want mine, shoot me a message! I still have it haha.
Installing Window Regulator
Ordering New Parts
You have two options: you can call a service center to see if they have stock for pickup immediately, or you can order to be shipped to your house. If you call the service center, press 1 for vehicles, then press 1 for service, then say the reason for your call “window regulator”, then you can finally press 5 to get to your local service center
I was quoted 6 days (4 business days) for shipping online. I picked up from a service center within the hour. Prices are the same regardless of how you order: $165.
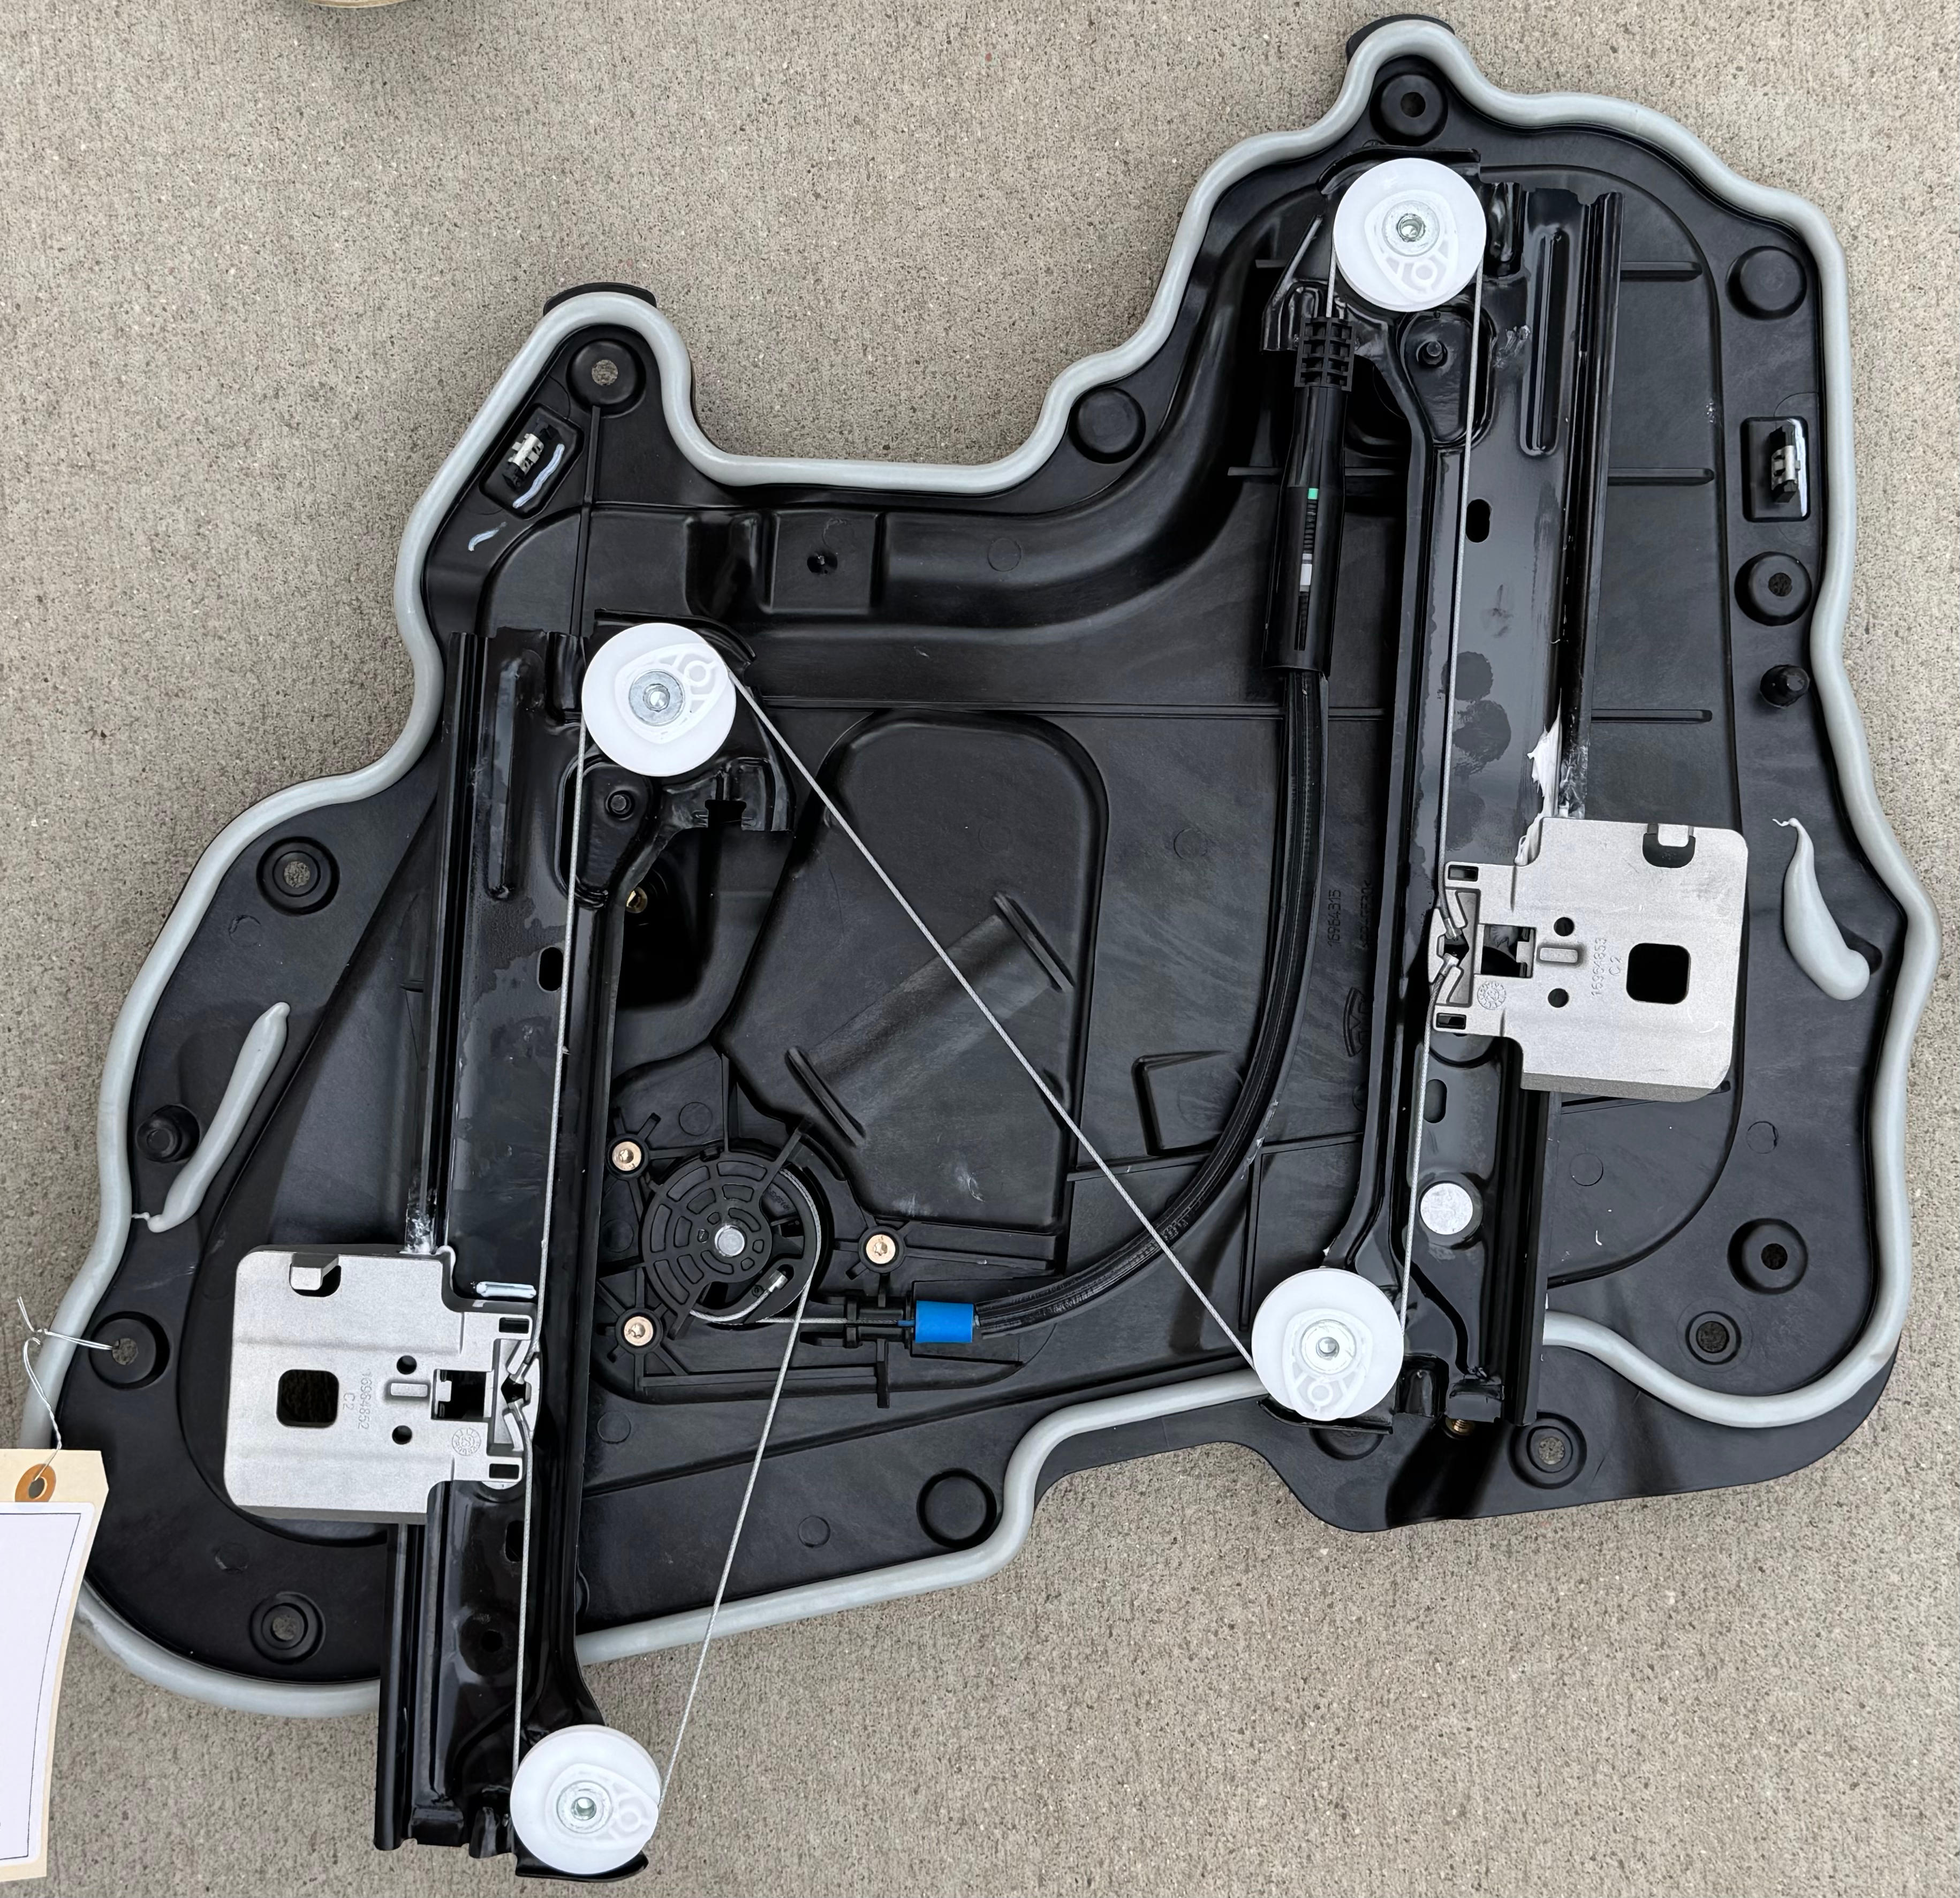 A brand new
 1096622-98-L Rear Driver Window Regulator Motor
Installation
Just follow disassembly instructions in reverse.
Some torque specs:
- Screws into the window = 9.5 Nm = 7.0 lbs-ft
- 13x 8mm screws around the outside of the black plastic panel = 4 Nm = 2.9 lbs-ft
- 2x T30 screws underneath the arm rest = 6 Nm = 4.4 lbs-ft
Recalibrating the Window Motors
If you’re looking for a quick fix, you might as well try to calibrate the window motors before tearing the door apart. I don’t think I needed to do this after installing the new window motor assembly, seemed like it was calibrated just fine, but it doesn’t hurt and in the spirit of completeness, here’s how.
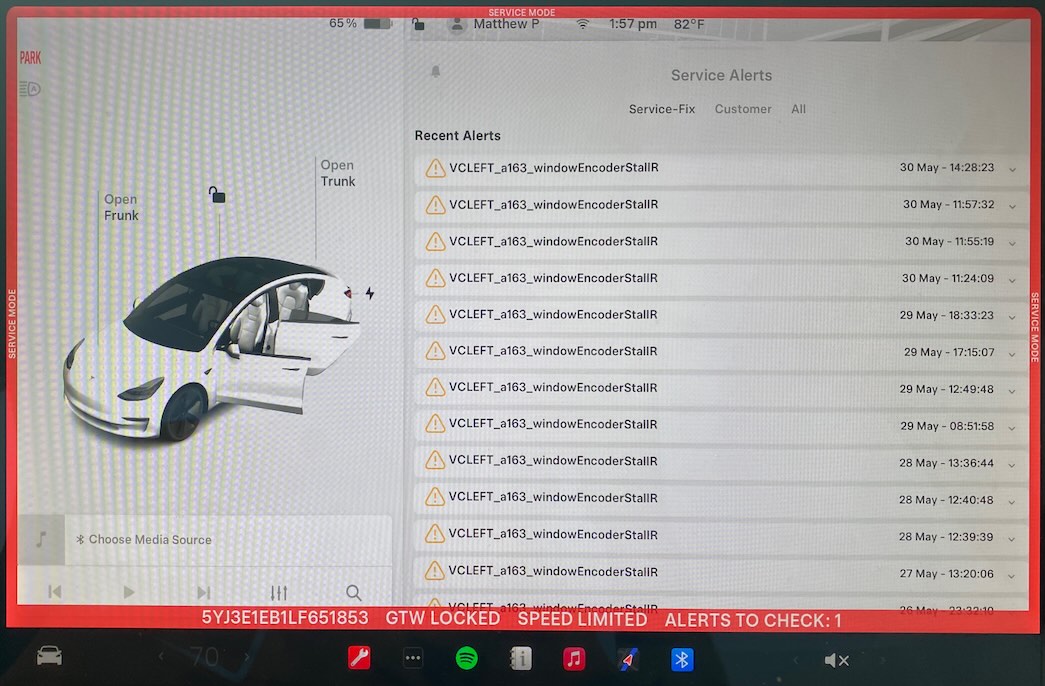
First, you need to put the car into service mode. To do that, tap on the car in the bottom left, then software, then you need to press and hold on the Model 3 for about five seconds. Then the access code is “service”. Pressing enter will bring us into service mode. There’s a bunch of cool diagnostics in here but… explore it responsibly. If you tap on service alerts, you can see what your car is unhappy about. My car is unhappy about the rear left window encoder, which makes sense. And apparently it’s been unhappy about that for the last month, but the warnings I guess were never strong enough to be viewable outside of service mode. But, if you see these VCLEFT_a163_windowEncoderStallR warnings, you’re probably going to have to replace the assembly.
 Numerous
 VCLEFT_a163_windowEncoderStallR warnings
Going back into service mode, we want to go to closures, then windows. Click on the window that you want to calibrate. For me, the car was waiting on an “unknown” task to complete. I waited a while… it never completed. So I exited service mode then went back in which seemed to fix that. Then, make sure the door is closed. Pinch detection is disabled so keep your grubby little fingers away from the window. And then click run.
For this to run, we need to “unlock the gateway”. I think you need to do this whenever you want to modify any values in service mode. So this is kind of a “are you really sure you want to do this”? We need to have the key in the vehicle then press and hold the brake and right turn signal for 8 seconds. Finally, we can click “Calibrate”.
While I’m here, I’ve actually been having some wind noise whenever the windows are closed. I find that if I lower the windows just a smidge, things will actually get quieter in the car. So I am going to recalibrate all the windows… Looking back on it, I think it did help with wind noise a little bit.
Outro
All right, folks! I think that’s a job well done. Let me know in the comments if this was helpful to you, what you managed to do to fix your window, and if there was anything I missed.
I have a few other Model 3-related posts that I’d recommend checking out. While there might not be much there now, there is more on the way.
Thank you very much for reading, I’ll talk to you all soon.
Disclaimer: Matt Popovich is not a mechanic. Please do your own research and consult with a professional before attempting any DIY repairs. Matt Popovich assumes no liability for property damage or injury incurred as a result of any of the information contained in this post. Matt Popovich does not provide a warranty for any of the listed information and does not guarantee any expressed or implied result. Use this information at your own risk. Matt Popovich recommends safe practices when working on vehicles and or with tools seen or implied in this post. Any injury, damage, or loss that may result from improper use of these tools, equipment, or from the information contained in this post is the sole responsibility of the user and not Matt Popovich.